JDK 在1.4添加了新的Java IO类,用以提高IO速度。实际上,旧的IO包已经使用NIO重新实现过,因此即使不显式使用NIO,也能获得速度上的提高。
先从例子说起:1
2
3
4
5
6
7
8
9
10
11
12
13
14
15
16
17
18
19
20
21
22
23
24
25
26
27
28
29
30
31
32
33
34
35
36
37
38
39
40
41
42
43
44
45
46
47
48
49
50
51
52public class Nio {
public static void main(String[] args) {
// TODO Auto-generated method stub
String src = "D:\\大数据竞赛\\train_data.txt";
String des = "D:\\大数据竞赛\\train_data_copy.txt";
long begin = System.currentTimeMillis();
//fileCopy(src, des);
copyUsingStream(src, des, 2048);//1024 523 2048 428
System.out.print(System.currentTimeMillis()-begin);
}
//1024(3962),2048(1061),4096(688),8192 485
public static void fileCopy(String src, String des){
try {
@SuppressWarnings("resource")
FileChannel in = new FileInputStream(src).getChannel(),
out = new FileOutputStream(des).getChannel();
ByteBuffer buffer = ByteBuffer.allocate(8192);
while(in.read(buffer) != -1){
buffer.flip();
out.write(buffer);
buffer.clear();
}
in.close();
out.close();
} catch (IOException e) {
// TODO Auto-generated catch block
e.printStackTrace();
}
}
//1024 523 2048 428 public static void copyUsingStream(String src, String des, int byteSize){
byte[] temp = new byte[byteSize];
try {
BufferedInputStream bufferedInputStream =
new BufferedInputStream(new FileInputStream(src));
BufferedOutputStream bufferedOutputStream =
new BufferedOutputStream(new FileOutputStream(des));
while(bufferedInputStream.read(temp) != -1){
bufferedOutputStream.write(temp);
}
bufferedInputStream.close();
bufferedOutputStream.close();
} catch (IOException e) {
// TODO Auto-generated catch block
e.printStackTrace();
}
}
}
fileCopy和copyUsingStream都实现了一个拷贝文件的功能,不同的是fileCopy使用nio实现,copyUsingStream使用stream实现。其中Buffered Stream使用默认8192个字节大小的缓存,并使用一个temp字节数组来读取输入,和写入到输出。下面看看他们拷贝一个200m的文件使用的时间:
| buffer/temp size | 1024 | 2048 | 4096 | 8192 |
|---|---|---|---|---|
| fileCopy | 3962 | 1061 | 688 | 485 |
| copyUsingStream | 523 | 428 | 425 | 423 |
可以看到使用Java io使用了nio重新实现,且优化了性能。下面让我们来看看nio中需要接触到的东西。
buffer
NIO具有更好的速度性能来自于其所使用的结构更近似于操作系统的IO方式:通道和缓冲器。下面先来看看缓冲器的实现:
buffer具有四个标志位:mark,position,limit,capacity;分别表示标记,位置,界线和容量。位置表示读或写操作是位置,界线用来界定读或许操作的终点,所以buffer在读写操作转换时,需要重新设置他们的标志(基本上是position,limit)。
public final Buffer mark() //将mark=position,结合reset()使用
public final Buffer flip()//mark=-1,limit=postion,position=0.写转读操作调用
public final Buffer clear()//mark=-1,limit=capacity,position=0.写覆盖
public final Buffer rewind()//mark=-1,position=0重读
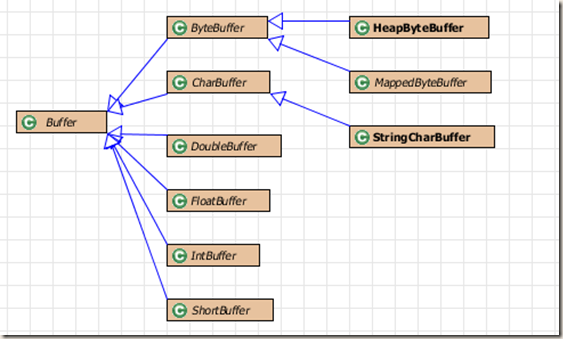
上面是buffer类的部分继承结构,在nio包中还用大量的拥有不同特性的buffer扩展,可以去查看源码。虽然基本类型有相应的buffer,但其底层都使用了ByteBuffer,ByteBuffer提供了视图功能,这样可以很方便的想ByteBuffer中读写基本数据类型。
1 | public static void viewBuffer(int bufferSize){ |
注意:不同机器或操作系统可能有不同的字节存放顺序,因此有时可能需要使用ByteOrder显式说明。
MappedByteBuffer
MappedByteBuffer可以实现一个内存文件映射的能力,有了这个功能我们可以将非常大的文件,“假定”装在内存中,并且可以当做数组访问。
1 | public static void mapFile(){ |
MappedByteBuffer将文件的一段放入内存中,上面将0到length长度的文本放到内存。使用RandomAccessFile可以对文件进行读写,FileInputStream和FileOutputStream仅能得到读或写权限。